Git and collaborative coding
Arthur de Grandpré
August 2020
- Why a workshop about reproducibility, collaborative coding and Git?
- Planning
- Important note
- Annotate for reproducibility
- Storage and Safekeeping
- Version Control Systems (VCS)
Disclaimer: This document is material for a live 90 minute workshop and might feel incomplete out of context.
Why a workshop about reproducibility, collaborative coding and Git?
Previous workshops have been :
-
Dedicated to enhancing coding and data science skills
-
Largely based on the R environment
-
Providing a strong foundation in numeracy
But, as most of us are ecologists as opposed to professional programmers, our previous workshops had foregone an important dimension of data science, i.e. basic coding hygiene that should be expected to :
-
Ensure reproducibility of analysis
-
Ensure safe archiving of data and scripts
-
Allow for efficient collaboration in your coding projects
Regardless of whether you are working alone or in collaboration with others, we all need to be able to work efficiently to ensure clarity and reproducibility in science. This workshop is about tips and tricks to make your work more reproducible and collab-friendly.
Planning
The goal of this workshop is that by the end of the hour and a half, attendees are able to figure out their own recipe for version control and efficient collaborative coding.
To do so, we will go through:
-
Basic annotation tips
-
How to structure scripts and projects efficiently
-
How to ensure archiving of scripts (version control, backups, etc.)
-
How to share your scripts and their results
Important note

There is no single best recipe for preparing, cleaning and safekeeping your work. The following is just based on personal experience and research, but the most important thing is to find your own way of being efficient with sufficient clarity to be able to share your work. See https://www.nature.com/news/1-500-scientists-lift-the-lid-on-reproducibility-1.19970 for more insight on the topic.
This is mostly an effort to make sure everyone has some basic reflexes when working on their scripts.
Annotate for reproducibility
One of the pillars of science is reproducibility of results. Sadly, it is also one of the most neglected aspects of our work. Some authors even consider that we are going through a reproducibility crisis, in which a lot of the published science is actually quite obscure, with incomprehensible or unavailable methods and software codes.
This section is mostly about how to write your code in a way that is understandable to others, but also yourself when you go back to it after a few months (or years) working on something else.
We have all written or received chunks of code that can look like the following:
r1=brick("data/test_CIR_clip_01.tif", crs="+init:epsg=26918") ; r1=r1/255
r1$ndvi=(r1$test_CIR_clip_01.1-r1$test_CIR_clip_01.2)/(r1$test_CIR_clip_01.1+r1$test_CIR_clip_01.2)
r2[r2$ndvi<(-0.45) | r2$test_CIR_clip_01.3>0.42]=-10
r3=r2$ndvi
r3[r3>(-10)]=1 ; r3[r3==(-10)]=0
p=rasterToPolygons(r3, dissolve=T)
p=disaggregate(p)
pr=rasterize(p,r3)
ps=PatchStat(pr)
p@data$patchID=rownames(p@data)
p2=merge(p,ps, by="patchID") ; p2=p2[complete.cases(p2@data),]
rc=rasterize(p2, r3, field="ndvi")
pv=p2[p2@data$ndvi==1,]
pr2=rasterize(pv, r3)
PS = PatchStat(pr2)
CS = ClassStat(rc)
Scripts that work, or have worked in the past, but that would be really difficult to use again since they contain absolutely no indication about what they are supposed to do, or what the data are and how they are transformed.
There are many ways to tackle reproducibility of an analysis; the easiest is to plan your code for it since $T_0$.
This can be done by:
- Working with projects
- Not procrastinating on the use of # everywhere to annotate your code (don’t hesitate to over describe, and even discuss results in some cases)
- Planning your code like you would plan a written document (flowing, logical process)
- Using Notebooks (sometimes!): R Markdown (Thanks Lucas for his workshop on the subject), Jupyter (for Python), LiveScript (for Matlab)
- Writing your code in the most generic way possible (the less specific you are, the easier it will be to transfer your code)
- Writing your own functions and including those in the R project. You could even consider transforming your project into an R package
(if you want to do so, check out the package “roxygen2” and the following tutorial:
https://tinyheero.GitHub.io/jekyll/update/2015/07/26/making-your-first-R-package.html)
Bottom line : Code for future you if not for others
In the previous example, several things can be modified to make it easier to handle. This is the same code, slightly modified to make collaborative coding easier.
#### landscape metrics extraction ####

# input raster data
path_to_files = "./data/"
images = dir(path_to_files,
             pattern=".tif$",
             full.names=T) # this gives the full path of every tif files in the project's data folder

# read the first image, set the CRS to NAD83 UTM18N and bring the scale down to 0-1
r = brick(images[1], crs="+init:epsg=26918") ; r=r/255
# set the layer names to their actual color (THIS MIGHT CHANGED BASED ON YOUR DATA)
names(r) = ("nir","red","green")

# to calculate landscape metrics on vegetation patches, we need a mask of the vegetation
# that will be easier with a vegetation index
# calculate normalized difference vegetation index (NDVI) as a new layer of r
r$ndvi=(r$nir-r$red)/(r$nir+r$red)

# select vegetated pixels based on treshold values of green and ndvi, and make a binary image
# those values were obtained by manual treshold visualisation
ndvi_treshold = -0.45
green_treshold = 0.42

r2 = r
r2[r2$ndvi<ndvi_treshold | r2$green>green_treshold]=-10
r3=r2$ndvi
r3[r3>(-10)]=1 ; r3[r3==(-10)]=0 # 1 is vegetation and 0 is the rest

# transform the binary image into a raster where every vegetation patch has an ID
p=rasterToPolygons(r3, dissolve=T) # turns the raster into polygons, dissolve set as TRUE will merge adjacent polygons of equal value
p=disaggregate(p) # disaggregate will separate non touching polygons of the same class
pr=rasterize(p,r3) # rasterize will transform the polygons into a raster where all classes have their own ID
ps=PatchStat(pr) # ps will contain landscape patch statistics for every patch.

# and so on...

### end of landscape metrics extraction
- the section and subsections are named
- all functions are annotated to say why they are used
- some choices are justified directly
- the input and output are identified, and the paths are made in a way that any file name can be used, as long as it has the right format and it is put inside the project’s data folder
- there are some warnings about things that could change based on the nature of the input data
Storage and Safekeeping
Another most important element of reproducibility is being able to keep the original work.
There are many different ways to safely keep your data and scripts.
It can be done locally:
-
using redundancy on multiple devices (backups, local or network (server, NAS, etc.))
-
can be scheduled or done manually
-
Ideally requires different physical locations (some dedication)
Or remotely.. with Caution:


Some services have paywalls or hard limits that can cause issues. Also, it should never be assumed that your files are safe on a remote server.
In most cases, both local and remote backups are necessary.
- Local is useful for larger files (very large datasets, high resolution images).
- Remote allows for easier access by different users, or through different platforms, but might be unreliable.
- Some services are not considered “secure” for sensitive data. For example, many universities prefer institutional OneDrive accounts over Dropbox or Google Drive. Some collaborators (e.g., government ministries) may not allow you to store some of their data on some cloud services. Check with your IT service and your collaborators before uploading datasets that might include sensitive information.
Some parts of the same project, such as large datasets, can be local only, while others can be hosted remotely, such as scripts.
So what should be saved, where and how?
It depends on the project, collaborators, etc. (plan ahead)
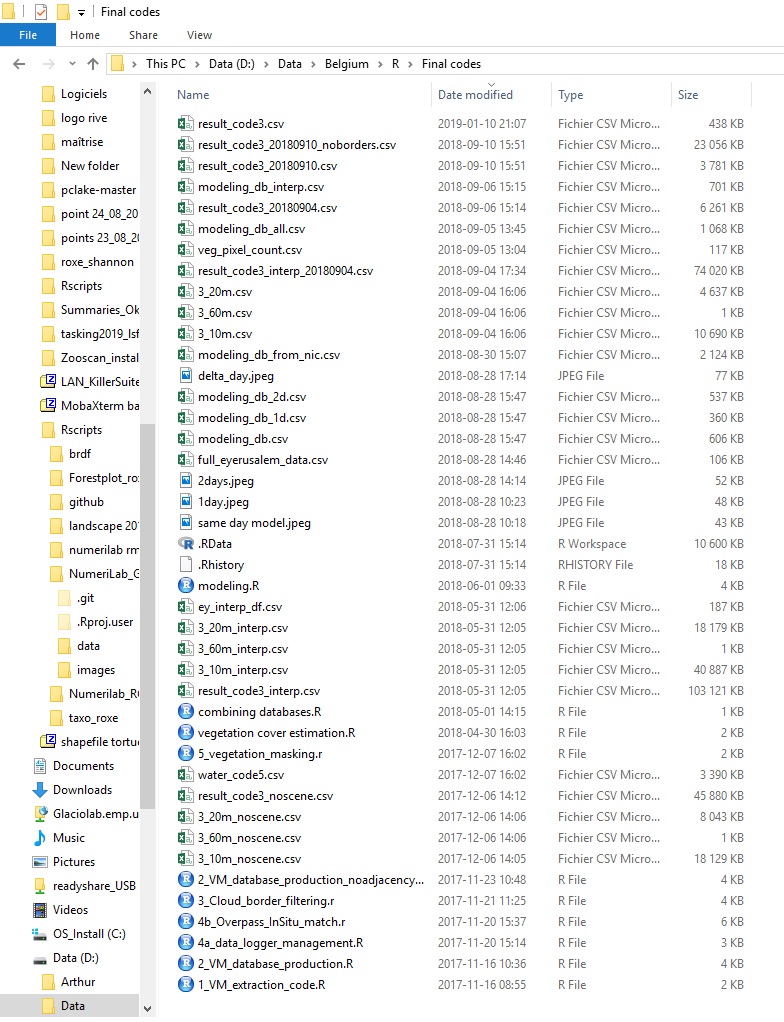
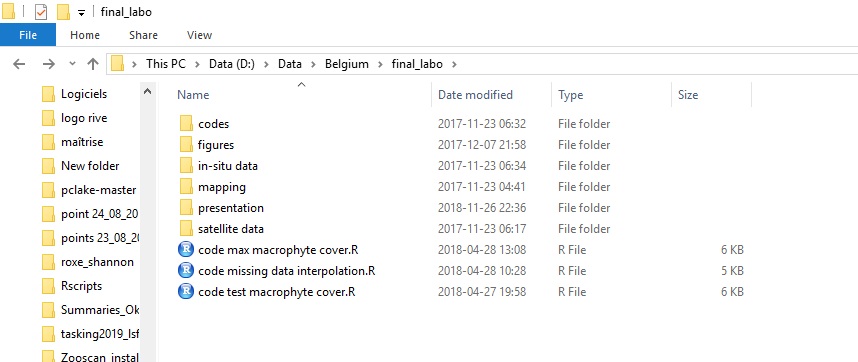
Example of bad data handling
At one point or another, most of us realize that the way we organize our scripts and projects is BAD.
This happened to me when I started collaborating with others…
Multiple scripts with multiple collaborators for the same project.
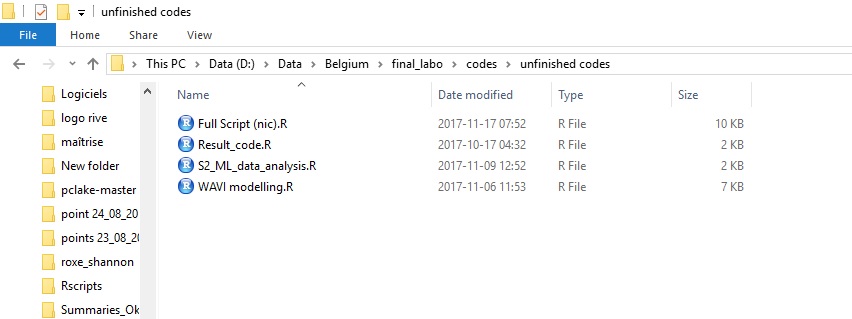
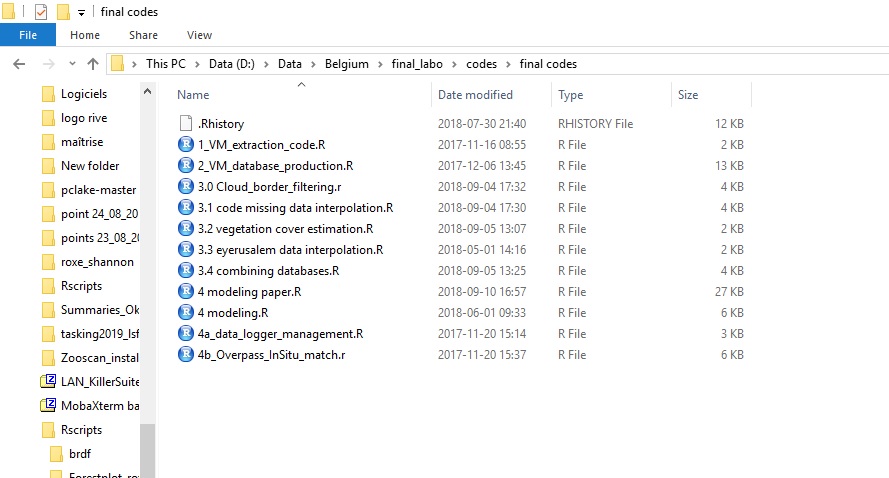
All of us had different versions of scripts and databases in multiple locations. Those screenshots are from my laptop, AFTER cleaning up.
Location 1

Location 2
Location 3
Location 4
Location 5
That is just not good enough for collaborative projects because of the very fast versioning of many files, by multiple users.
Version Control Systems (VCS)
One of the best solutions to those problems is the use of version control systems, such as Git (or many others, such as SVN, CSV, Mercurial, etc). When combined with a clean project approach and the use of tools such as RMarkdown, it allows for the same project to be held within a very simple directory such as the following one :
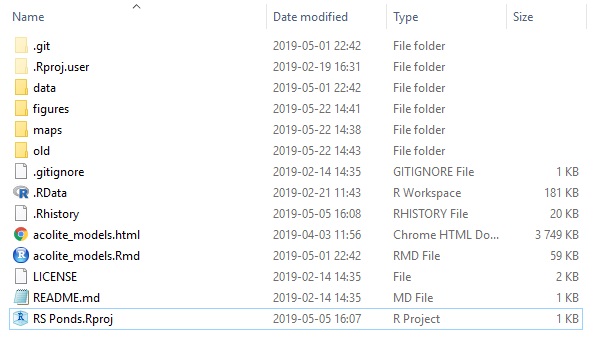
Where all users can store files and track changes occurring in them, while keeping each others environment free of clutter.
Git
![]()
Git is its own language and can be implemented in most operating systems.
It is based on repositories containing the latest updates commited by any user.
Commits act as snapshots, which can always be reverted to a previous state (e.g. a prior commit).
Being easily decentralized, it is especially effective for collaborative work using GitHub, or Gitlab notably.
Basic Git workflow
- Initialise / Clone / Fork / Open a repository
- Work
- Commit changes locally
- Push changes to remote repository (GitHub)
To learn about the basic commands : https://www.youtube.com/watch?v=SWYqp7iY_Tc
very good ~30min tutorial (the equivalent will be done LIVE during the workshop)
Other Git related things
GUI vs commands : There are many environments that allow the use of Git. The most basic one is gitbash, where all commands must be written by hand. Some programs, like RStudio, have their own implementation of Git within their own UI. It is also possible to have external programs to help you with git, such as Gitkraken, or GitHub desktop, which facilitates the use of GitHub on your personal computer.
.gitignore : a text file named .gitignore in your repo will tell Git which files should be ignored.
For mac users who have a .DS_Store file in each folder (which you probably do not want to upload), the following website helps you tell Git to always ignore these files.
storage capacity : A git repository is generally has little storage capacity; GitHub won’t accept very large commits. Think about other ways of storing large files.
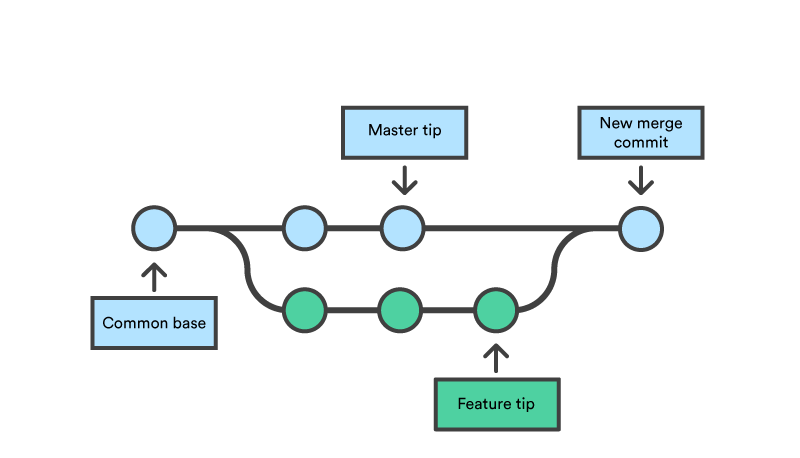
branching and merging : Branching and merging are ways for different versions of a project to co-exist. If your team wants to develop multiple functions in a single workflow, one branch could be developed for every function, and then they can be merged together into another branch. This allows for parallel work, or simply for keeping different versions intact. While this may be intimidating at first, playing with the branching function is quite easy and you will familiarize yourself with it very fast.
exercise : Git bash
- install Git and open gitbash on a new folder
- configure Git (git config –global user.name “name” & git config –global user.email “your@email.com”)
- init a repo (git init)
- stage/track (touch xx.html, git add, git status)
- commit (git commit -m “message”)
- history (git log)
- return (git checkout
) - branching (git branch, git checkout, git branch
, git checkout) - merging branches (git merge
)
GitHub (or its alternatives : Gitlab and Bitbucket)
GitHub is basically a cloud service for Git.
It allows users to publish their repositories privately or publicly, allowing other users to clone them and collaborate. It interacts very efficiently with the Git language and has a very nice GUI application (GitHub Desktop)
Specs:
- no user disk quotas
- hard limit of 100Gb / repo
- hard limit of 100Mb / file (!)
This means:
- Larger files should be kept out of GitHub (In any case, your bigger, original files should be backed locally by every collaborator)
- Smaller files (subsets) should be used while building the code and working with GitHub (which makes sense for collaborative purposes)
Git as a language vs Git as a tool
The most basic Git implementations can be very difficult at first because Git is foremost a programming language.
It can be difficult to bring a new language in your workflow without making the processing feel heavier than necessary.
Many alternatives to coding in the terminal exist when using Git, such as RStudio or GitHub Desktop. These alternatives can make using Git much easier. To learn how to use Git directly from Rstudio without having to learn a single command for the terminal, we recommend the following (free) online book by Jenny Bryan, prof of data science at UBC and senior software engineer at RStudio:
https://happygitwithr.com/